|
Stacking Comet Images |
|
|
[July 2020]
Note: I am not an expert in comet image processing or in any of the programs mentioned below... Comet NEOWISE is a tough target to shoot and process because of several factors which are typical of the challenges of imaging comets. Unfortunately for those of us at low latitudes (southern California), all of these factors are a problem.
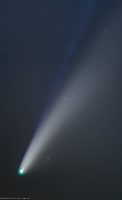
Note that in this writeup I’m referring to taking color shots with a one-shot color camera (a Nikon D850 in my case). Here’s a video I came across about editing Comet NEOWISE photos (Peter Zelinka). https://www.youtube.com/watch?v=3jb08YSkLmM In his video, Peter shows how he falls back on manual alignment in Photoshop. More importantly, he shows some examples of failures to align images in Deep Sky Stacker (DSS) and Sequator as well as problems he had when using manual alignment in Photoshop. I wanted to expand and comment on Peter’s tutorial and to respond to some private questions I've gotten. Some comments are a matter of “style” as is true for any astroimage processing, so take my comments as just an alternative path. Stacking with DSSI have not used Sequator, but have some experience with DSS. Like Peter, I found that having a light background causes some problems so it’s important to make sure the shots you take are not overexposed for the sky background. You may need to adjust this as time passes as the sky will be getting dimmer, but with increasing light pollution as the comet sets. I did not have any problem myself with DSS finding stars. However, the closer a comet is to us (Earth), the more it will be moving relative to the stars. This will blur the comet features if you align your shots with the stars. Unless your image scale is very small, it doesn’t look good to my eye. DSS actually includes a comet mode in which you also have the option to align on the comet nucleus. If your scale is small enough, DSS can automatically locate it once you have told it where the nucleus is on one image. You can check subsequent images in the stack to see if it is “tracking” the comet properly. However, if the nucleus is diffuse enough, DSS will fail to locate the nucleus. In this case you need to go through each image to manually point at the nucleus. A subtlety to the DSS interface is that if you want freedom to point anywhere without a snapping of the pointer, you need to hold down the shift key while clicking with the mouse. In either automatic or manual case, if you select the comet alignment option when stacking, the comet should be used as the reference point, and if it is moving relative to the stars, the stars will be trailing. DSS also has the option of combining this with a star-aligned version, yielding a stacked comet against a stacked starfield. This looks nice, but can have problems when the tail is passing through a field of stars, so since I prefer the “normal” long exposure style image which has trailed stars, I don’t do this. In my case, for NEOWISE, it didn’t work properly anyway (I don’t know why), so I gave up doing the stacking that way. Comments on Peter’s Stacking with PhotoshopPeter’s video of stacking with Photoshop is OK, but I prefer to do a stack with as “raw” an image as possible. It’s true that the camera itself is doing some nonlinear processing, but using a raw file or a TIFF version of a raw frame before adjusting the color balance or any other type of tweaking is better, in my opinion. In some cases it won’t make a difference, but if you are using a set of flat images, you should do this preprocessing before tweaking the light images or you will get strange artifacts. Another comment I have regarding manual alignment in Photoshop is that it’s better to pick a single frame and align all other frames to it. If you do as he did and work your way up the layers using adjacent frames, you will usually find that you are not aligned if you pick any two random layers. Also note that to stack frames over a long time interval, you really should be tracking. All lenses include some distortion across the field so if you are on a tripod and manually centering every few minutes or are stacking images which have drifted across the frame, the stars are probably shifting in position relative to each other due to lens distortion. Any program which is used to register stars needs to do localized registration to deal with this. The other comment I have about stacking shots over a long period is that near the horizon, it’s nearly impossible to align frames because atmospheric refraction is affecting the position of stars near the top of the frame relative to the bottom. There will also be differential refraction of the color channels on stars near the bottom if you look closely enough. For normal starfields, one should avoid shooting close to the horizon (ideally). When I do have a wide field “normal” astrophoto which goes right down to the horizon, I sometimes decompose the color frame into separate R, G, and B frames and register them using a program called Registar (not Registax). This program was meant to deal with the distortion often present in film images by locally aligning stars across the frame. For NEOWISE, of course, this is not an option. My Processing with DSS (fail)After the preprocessing frame corrections, I tried using DSS using the comet mode. Since in my telescopic (500mm FL) image, the nucleus was large, so I had to manually tell DSS where the nucleus was. But the stacking did not work. This could be a result of my inexperience with DSS, but the stacks always looked misaligned and because I couldn’t see a way to save each of the aligned images separately for separate examination, I couldn’t find the problem. It could be that a few of the frames were slightly misaligned, but it looked like the stack was far off in some of my tries. Processing with NebulosityStar alignment with Nebulosity is always somewhat of a pain because it’s a semi-automated process. You have to designate one or two reference stars, and then confirm that the software has found the same stars in each frame, or just go on “full auto” and pray that it has found the right stars on each frame. As far as I can tell, the registration assumes a rigid image frame and handles x-y translation, rotation, and scaling, but does not do localized registration like Registar, but I haven’t tried it myself. http://stark-labs.com/nebulosity.html For the case of NEOWISE, I used a single registration point (i.e. only x-y translation), and used the comet nucleus as the reference point. This stacked properly (stars became straight trails). The additional nice feature of Nebulosity is that you can also (optionally) output the registered frames for individual inspection should something go wrong with the creation of the final stacked image. I also used Nebulosity for the preprocessing step of applying a flat field to each frame prior to stacking. Like Peter, I used Adobe's Camera Raw program to convert from Nikon raw format to 16-bit TIFF frames before preprocessing with Nebulosity. Final ProcessingGenerally, I like to keep postprocessing as simple as possible by proceeding directly to Lightroom, but for this comet (as with many comets), there are subtle details that need to be handled with curve manipulation layers and/or sharpening. Some of this can be done in the camera raw filter (which is the same as Lightroom), but I also wanted to apply different filters and layered adjustments. The final processing steps are a whole separate can of worms not addressed here.... Good luck in your shooting/processing. |
|