
Assuming you've decided to use an equatorial mount to watch a solar eclipse, most astrophotographers accustomed to night photography try to precisely align their mount. The good news is that exact polar alignment is not necessary because the longest exposure we'll be taking is at most just a few seconds long. The primary reason for using an aligned tracking mount is to minimize the inconvenience of excessive drift over the course of the eclipse, which is around 3 hours long. Some slow drift is OK. You just don't want to have to be continuously correcting the tracking.
Since you can't use Polaris to align your mount in the daytime, and exact alignment is not necessary, just follow these steps:
- Set the mount's altitude adjustment to match your site's latitude
- Level the mount
- Use a compass and knowledge of the magnetic north offset to set the mount's azimuth adjustment
The 3rd step is the most difficult to get right, but this can obviously be practiced before an eclipse, so you have plenty of time to get comfortable with this before the big day. An alternative is to study a map of your observing area to find reference points such as N-S or E-W roads.
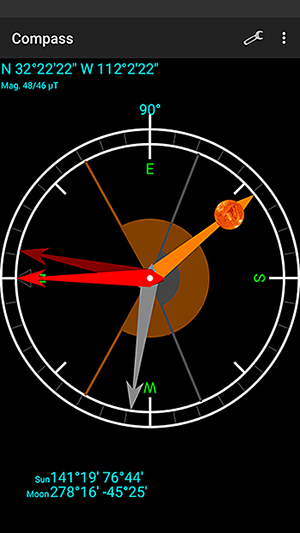
Against a compass face, the app displays the current direction to the sun (orange arrow) and moon (gray arrow). To determine north using this app, note the shadow direction of a vertical pole to give you the azimuth to the sun, align this with the sun arrow on the app display, and look along the bright red arrow to find geographic north.
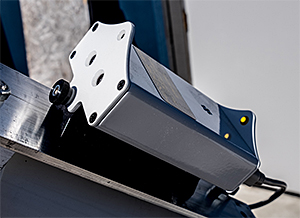
For the ultimate in convenience, you can use a solar autoguider. The Hinode solar autoguider (sold by Hutech) is a stand-alone (no computer required), self-contained unit (optics, sensor, internal computer) which tracks the sun and sends corrections to your mount's autoguider port. The top of the guider also includes a solar finder, making it easy to initially point your telescope at the sun.
The autoguiding makes it a completely hands-off operation of your mount during partial phases as the autoguider will keep the uncovered portion of the sun centered continuously. This guiding can be seen in this video of the 2014 partial solar eclipse as seen from New Mexico. For this eclipse, I was able to set my mount down without bothering to level and just set the polar axis approximately north without a compass.
For a total eclipse, I would take more care to align the mount because the guider will not function during totality. Near totality (perhaps 10 minutes before), I would turn off autoguiding and re-center the sun, allowing the mount to track unguided through totality.
During the few minutes of totality the solar guider will not have enough light to continue guiding the mount, so the mount will "coast" through the totality phase. Once the sun is uncovered again after totality, the guider can be turned on to resume guiding and center the uncovered crescent of the sun.
For a time-lapse comparison of no tracking vs. unguided tracking vs. guided tracking, click on the video at right. For these videos, my mount was preset to the correct latitude, placed on a concrete pad with no leveling check, and aligned north against a distant reference point. I simply picked up the entire mount and rotated it into place "by eyeball". The tracking speed was left in sidereal mode for this mid-afternoon test (the clock time is not the actual time of day).